Wednesday, June 29, 2011

Recipe: Mocha Cupcakes and Chocolate Butter Cream Icing

It's been ages since I shared a recipe. I have been baking but have tended to be going back to my favourite recipes each time or forgetting to take photos when I try something new!

For hubbies birthday I offered to bake him a cake or cupcakes. He chose Mocha cupcakes (I reeled off a list he could choose from that I knew I'd be happy trying to make!)

I used Paisley Jade's Mocha cupcake recipe and the cakes were DELICIOUS! The only thing I would perhaps change is to add a bit more coffee or use stronger coffee next time. I'd also probably attempt mocha icing next time too.


I decided to decorate them with chocolate butter icing and hunted around online for a recipe. In the end I merged a few together and I thought I'd share...

CHOCOLATE BUTTER ICING

Ingredients:
4 tbsp cocoa
3tbsp milk, warmed
100g butter, softened
1 1/2 cups icing sugar, sifted
few drops of vanilla essence

Method:
1. Mix cocoa in warm milk to dissolve and leave to cool
2. Beat the butter (in a separate bowl) until pale and fluffy
3. Gradually add the sifted icing sugar to the butter and beat together
4. Beat in the vanilla essence
5. Beat in the cocoa and milk mixture
6. Spread onto your cakes using a knife


And if you have a football loving husband add a football candle :-) (Yes, it's called football and not soccer in this house!)


Yummy :-)

Tuesday, June 28, 2011

Scrapbooking: Us 3

I decided to have a go at a second layout using the same challenge instructions from the Scrappin' Patch Queens Birthday DT challenge to see if I could make it look different.


I used a couple of things I'd been saving for a long time - the diecut rainbow and cloud and the journalling tag had been hanging around waiting for the right layout for quite a while!
It's ended up being a very busy layout but one I'm glad I got done for baby's album.
You can see my original layout and the challenge instructions here.

Thursday, June 23, 2011

My Creative Space: Superhero Cape

We've been invited to a 1st birthday party with the theme of heroes and villains at the weekend. I looked around online and the shops for costumes but was scandalised by the cost of most of them ($40+ and it's probably only going to be worn once!). They were cheaper overseas but I wasn't convinced the post would be quick enough to get here in time.

So I decided to make a superhero cape for baby boy.
And I should probably add here that I am the worst ever at sewing! It just doesn't come naturally to me...so there were a fair few swear words mentioned during the making of the cape :-) (thank goodness I did it while baby was sleeping in bed!)


Anyway, I'd saved some old t-shirts in my sewing stuff box (stuff I could practice on without wasting fabric I paid for!) including a navy t-shirt. I decided to cut the back panel and collar out as one into a cape type shape. I then tidied up the cut edges (is that called hemming?!) which was probably the longest job because I can't work the sewing machine properly!

I also made a suitable superhero logo using felt and embroidery thread (hanging about from the friendship bracelet making of last week!). I printed a star to use and drew around the bottom of a small metal bucket for the circle and cut each out of felt before sewing them together and then onto the back of the cape.


It's not quite finished yet. I need to add some velcro to the collar part (which I cut in two so that there can be no strangling incidents) and tidy up those edges and then we should be ready to go.

And here are some pictures complete with superhero...


As you can see it's quite long so hopefully it will be able to get tucked away in a special box just for dressing up and costumes and last a wee while yet :-)

Perhaps this is a case of "the baby maketh the cape" :-)


On a side note: I can't believe babies from our antenatal class are already turning 1! 
Where has the year gone?

Linking up with Our Creative Spaces 
and


Thirty Hand Made Days


Wednesday, June 22, 2011

Winter Solstice

Yesterday was Winter Solstice here in New Zealand. The shortest day of the year. 
Now we are on the climb back towards summer and warm days and lighter evenings. Woop :-)

I decided to do something to celebrate the day. 
Here in New Zealand winter gets awfully long without any celebrations in the middle (I miss winter Christmas'!) so I needed to find someway to mark the season.

So out I toddled into the garden yesterday afternoon. I cut some of the camelia's to bring inside the house as they are providing such a lovely burst of colour on these chilly days. 

I refilled the bird feeder with seed because I'm sure the birds could do with some easy food right now.

I gathered and lit lots of candles on our mantlepiece.

And I got out the fairylights.

I also burned some Herb Farm anti-germ oil in the burner. It has cloves and cinnamon in it and is the most wintery smelling oil I have!

It all gave a rather warming affect and it was very cosy in our living room with the candles and fairy lights twinkling away. 
I'm also considering planting some garlic this week (probably at the weekend) because I hear winter solstice is the best time to plant it.
And I'm trying to spent a bit of time thinking and planning this week. In  my winter solstice research I saw mention again and again of it being a time for contemplation so I'm taking some time to evaluate where I am right now and where I want to be.

Tuesday, June 21, 2011

Tea Towel Swap: What I Received


Last week I was very excited to see a parcel in my postbox. I LOVE getting parcels :-) The parcel was from Deb - my partner in the tea towel swap hosted by Leonie and Kiwi at Heart. 
I don't know how I managed it but I realised what it was before opening it so took the time to grab the camera before ripping it open!
I opened the parcel bag to discover this lovely card and parcel...


The brown paper bag has the 'Little Girls' poem on it - how cute! I carefully opened the brown paper bag to unveil my goodies. Deb found a hand-stitched but damaged cushion when op shopping and re-purposed the lovely stitched flowers by sewing them to a red and white tea-towel. The flowers are so pretty. I'm not sure I can bring myself to actually use the teatowel - it may just have to be for display only! As well as the teatowel Deb also included a lovely little red date/notebook and some moisterising lotion.


I love receiving my parcel and definitely need to think about participating in more swaps.
You can see what I sent to Deb here. And Deb has commented to say she loved her parcel too which is awesome :-)

Monday, June 20, 2011

Happy Birthday Hubby! (iPhone style birthday card and minibook)

It's my hubby's birthday today - Happy Birthday G :-)

I thought I'd share the card and minibook I made for him. 
He has an iPhone which he loves so I decided to make him an iPhone style birthday card. 
I cut out an iPhone shape from black card and drew the edge and detail with a silver pencil. Then I added a white card 'screen' and cut out little square 'icons' to write Happy Birthday on it. As a finishing touch I drew the Apple icon on the back of the card!

I also made a minibook featuring 12 mini photos of hubby and baby since he was born. 
I made all the photos black and white to unify them and used an iPhone from a Westpac bank leaflet (advertising their app to save money) as a background. The photos were stuck to the screen part of the iPhone to make it look like a photo on the phone. 
I used 5 leaflets and cut the iPhone's out and backed each one with some patterned paper. I also used a silver Hambly screenprint I've had for ages to make a cover and back page. 
I'm really pleased with how it turned out and hope it will be a lovely pocket-sized momento of some special times between hubby and baby :-)


Friday, June 17, 2011

Things I'm Loving

And this week I'm Loving...

my 2nd friendship bracelet is coming along nicely...(and is actually finished and on my wrist as I post this!)

daffs on my mantelpiece, even though they make me sneeze...

I managed to get all dressed up and go out for a couple of hours with hubby last Saturday...

this house is full of silliness and I love it...

Hope you all have an awesome weekend :-)

Thursday, June 16, 2011

My Creative Space: Friendship Bracelet

I thought it was about time I joined in with Our Creative Spaces - I always love seeing the posts of everyone sharing what they are up to creatively.

Today I'm having a go at making a friendship bracelet. I think this could become quite addictive and I could end up with a handful of them very soon! I remember having them when I was a young girl - usually tied around my ankle or wrist for months on end - but I never learnt to make them until now.
I got the idea from Elise Blaha's blog and then hopped over to Honestly WTF for the tutorial.

(photo taken with Retro Camera app on my android phone)

It's an easily portable project - I just dug out my embroidery thread and a safety pin and grabbed some scissors and a ruler and I was away :-) It's currently pinned to my trousers to work on whenever I get the chance...although the boy has taken a liking to it and keeps trying to swing on it :-)

You can visit more creative spaces here.

Monday, June 13, 2011

Tea Towel Swap: What I Sent

I thought I'd share what I sent to my swap partner in the tea towel swap hosted by Leonie at Kiwi at Heart. I sent it over a week ago now so it should have been received by now :-)
There are so many lovely tea towels to chose from (and some hideous ones too!) and it was tough to decide. In the end I bought one that I would like to receive myself. I hope my swap partner likes pink! The teatowel is pink gingham and has a lovely crochet lace edging. As an extra treat I bought some cute butterfly printed tissues to pop in the parcel... 
 And here's my parcel all wrapped up with a little card I made to accompany it.
I'm not sure if my swap partner has a blog but Deb (from Wellington) - if you're reading this - I really hope you like your teatowel :-)

Friday, June 10, 2011

10 Things I'm Loving


As well as linking up with Paisley Jade's Things I'm Loving this week I thought I'd join in with Shimelle's 10 things (on the 10th of the month) so here goes...

THIS WEEK I'M LOVING 10 THINGS...

1. This photo showing classic 'Rhett' (the dog) - he's crazy and LOVES bubbles and the baby thinks he is hilarious (bubbles or not!)

2. We went to the Feilding (yes that is the right spelling!) Craft Market this morning and got the baby a gorgeous hand knitted fire truck jumper, 

3. Rik's Belgian Truffles (oh my gosh! has anyone else tried these? they are amazing!), 

4. a bottle of lemoncello and...

5. an apron for me! it's blue with gingham and scallopy lace trim and I love it. I foresee much baking wearing this apron...

6. This gorgeous boy who is 10 months old today. How can it be that in 2 short months we will be celebrating his 1st year in the world?

7. All going well tomorrow hubby and me are going out...together...minus the baby (thanks to a lovely neighbour who is babysitting for us). I even have an outfit picked out. Please keep all fingers and toes crossed that this actually happens!

8. Due to the planned night out I have a hair treatment and cut booked for tomorrow and I am looking forward to being pampered by my lovely hairdresser.

9. Finding my Scrap Your Day album earlier this week and deciding to finish it. I only need to do the front cover, March pages and the back page summary. Seems a bit daft when it was over 2 years ago but I LOVE the album and it would be good to have it finally finished.

10. Thinking that Winter Solstice is nearly here which means that the nights will slowly start drawing out and we are on our way back to better weather :-)

Hope you've all had a lovely week and wishing everyone a wonderful weekend :-)

Thursday, June 9, 2011

Scrapbooking: Document 2011: May

Lots of scrapbooking posts this week (well 2!) - that's what happens after a long weekend :-)
I managed to get my May pages completed for Document 2011.
Here's my envelope/calendar page featuring a beautiful sunset photo I took from our back garden...

Busy pocket pages this month. I swapped pocket style this month as only have a 10 pack of the other kind (6 lots of 4 x 6 landscape on each side) and can't find them anywhere in NZ. My local scrapbook shop were selling these ones individually though so I got 2 to make my pocket pages up to 12 (one for each month)...


I used my new silver washi tape for journalling strips. I thought it best to paint over all the passport details! I can't believe my baby has his first passport - crazy. And soon he'll probably have 2 because we got a British one so he travels on the same type as us but will probably apply for a kiwi one too!

And my main page this month isn't about one particular event - more a summary of all the things I made and baked because it was a busy month for that kind of thing!...

You can see all my Document 2011 pages here.

Tuesday, June 7, 2011

Scrapbooking: Our 1st Year Married (Scrappin' Patch Challenge)

I had heaps of fun with this layout. I had the photo picked ages ago and knew I wanted to do a quick summary of our 1st year as a married couple (it's part of my 29@29 list) but no matter what backgrounds I tried it wouldn't come together so the photo kept getting put aside...
And then the Scrappin' Patch design team came up with a 'bossy' challenge this Queens Birthday weekend...they issued a set up instructions in the forum on Saturday - one instruction approx. each hour. You could choose to do the layout as each instruction was issued or wait until they were all released and then do your layout.
I was too chicken to do each step before knowing the next one so jotted each one down and then sat down and did the layout on Sunday night.
I'm really pleased with how it's turned out...


And here are some of the details close up...a stamped image and 3 stickers...


And add 3 tags, 3 circles and 3 stars...


I have been looking at everyone's take on this challenge in the forum and it's amazing how different all the layouts look. I am even thinking about having another go with the same instructions to see how different I can make a second layout.

Here are the instructions if you fancy having a go...

1) Choose a 4 by 6 photo (can be landscape or portrait) and select a matching 12 by 12 piece of cardstock
2) Add a diecut
3) Choose 5 different patterned papers to match with the following sizes... 9.5 x 5.5", 1 x 11.5", 4.5 x 7", 0.5 x 11" and 2 x 2.5"
4) Add 3 circles, 3 tags and 3 stars (any sizes)
5) Add a stamped image
6) Add a ribbon, 3 stickers and 2 staples
7) Use 2 different coloured alphas for your title
8) Add a journal element or journal on an existing element
9) Doodle

If you do have a go have fun and leave me a link so I can see what you come up with!

Wednesday, June 1, 2011

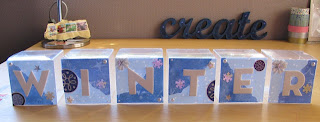
Winter Decoration (Seasonal blocks)

As part of my 29@29 list I wanted to find ways to celebrate each season. As well as making a list of things I love about each season I had an idea in my head for quite a while and finally got around to doing something about it this week. 
I realised a while ago that each season has 6 letters: spring, summer, autumn, winter...(I can be a little slow on the uptake at times! or maybe just unobservent until a craft project comes along!) I've seen lots of great seasonal signs around the internet but instead of making a separate sign for each season I had an idea of using cubes which could be turned around at the start of each season to show that seasons decoration. I hope I'm explaining myself properly!
I've been looking for wooden blocks for a while with little success. On Monday I hit Spotlight thinking they'd have something. I found Kaiser wooden photo cubes. Exactly the sort of thing I was looking for. Except they were $11.99 each. And I needed 6. That wasn't the kind of budget I had in mind for this project!
So I stood in Spotlight and brainstormed - favour boxes sprung to mind so I dashed off to the wedding related aisle. They had several different shapes but I found cubes. There were some lovely textured card ones but that wasn't the point as I was planning to cover it up. And then I found clear plastic cubes (approx. 2 inches across) - a pack of 10 for $14.99. A bargain compared to the wooden blocks plus I would have 4 spare in case I stuffed up!

Once I got them home it took me exactly until baby's next nap before I got to work...
Here are my 6 boxes all made up and the little 'canvas' I made for each one...

And here they are stuck on my blocks...
I used a mixture of blue paper, blue vellum, white thickers, snowflake confetti, white flowers, gems and stickers to decorate each one.

I'm really pleased with how they turned out and already have them adorning my fireplace...

I did consider waiting until each season was almost upon us before decorating for each one but I don't think I can wait that long so may start on the other sides soon.

Happy 1st day of winter/summer everyone depending on where you are :-)

LinkWithin

Related Posts Plugin for WordPress, Blogger...