I spent some time this past weekend getting ready for another Valentines project I want to do.
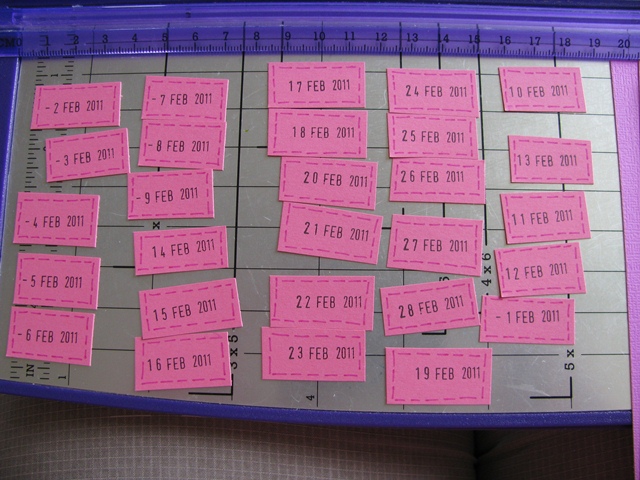
I have decided to make a mini book with a page each day throughout February. It will be a gratitude journal and each day I will list something I love. If I have time on my hands I might take pictures and write why I love something but not everyday...some days it may just be a few words (and hopefully some pretty paper or stickers!)
I loved journalling Christmas so much over December and early January and I thought it would be great to capture the things I love right now. What better time to celebrate this than the month that features Valentines!?
The other great thing about this project is I can use up some girly scrapbooking supplies. As so many of my scrapbooking layouts recently have featured my baby boy I find I'm not getting to use up the flowers and ribbons and pink papers that I've hoarded and I love. So this is my excuse to bring out the girly stuff and get it used!
So if anyone fancies joining along - here's what I've done to set it up...
I used 3 12x12 bits of card - in 3 shades of pink/purple - and cut them down to 6 4x6 pieces (I will either use my bind it all to put it all together at the end or I might just hole-punch it and use book rings like I did with my Christmas journal)
I've stamped out the dates 1st to 28th February and cut them out ready to go
I've decorated the front cover
And used the inside front cover for my 'mission statement'
I've stamped some journalling spots ready to go and I've gathered up lots of pink girly romance-y supplies
and put it all together in a box so I can keep it close by without making a huge mess!
I might think about doing a short blog post each day about what I love that day and then use that in the book or I might just keep a notepad handy (by the bed is always good so you can do it before you go to sleep) to jot something down each day. Ideally I will make a page a day but might end up doing a few at once.
So does anyone fancy joining in? If you don't fancy making a mini-book you could blog or tweet something you love each day throughout February instead? Would love to hear from you if you want to have a go...
Monday, January 31, 2011
Friday, January 28, 2011
29 @ 29 - quarterly review
I'm not promising to manage a review of this list every quarter but given it's just over 3 months in I thought I'd see where I'm at so far...
Colour-coded for colourful reading! PINK = complete, RED = in progress.
29 @ 29
DONE 1. Paint my toenails
IN PROGRESS 7/12 - 2. Scrapbook at least 12 moments of baby’s first year
IN PROGRESS - I've bought the seeds! - 3. Plant sunflower seeds/grow sunflowers
DONE 4. Eat tiramisu
DONE 5. Get my hair cut
6. Summarise/scrapbook our first year married
DONE 7. Read a novel
8. Lose 5kg
9. Decide if I’m returning to work or not
DONE 10. Participate in a Christmas ornament swap
DONE 11. Write a Christmas newsletter
DONE 12. See Harry Potter 7 (part 1)
13. List 29 reasons why I’m a good mother
DONE 14. Blog at least 29 times
DONE 15. Email at least 50 photos/videos of baby to family
16. Finish rainbow crochet blanket
17. Get a nice photo of all 3 of us (plus maybe the dog)
IN PROGRESS - planning to go to lessons with coffee group 18. Take baby swimming
IN PROGRESS 3/10 -19. Send 10 postcards or letters (with photos of baby maybe)
IN PROGRESS 8/10 -20. Buy at least 10 bunches of flowers
IN PROGRESS 6/10 -21. Try 10 new recipes
22. Create a photo wall (in the dining room?)
23. Make bunting for baby’s bedroom
24. Have a picnic or tea party
IN PROGRESS -25. Find ways to celebrate each season
IN PROGRESS - Have got 29 things ready to giveaway but need to drop off at the charity shop - 26. Give away at least 29 things
IN PROGRESS -27. Try to take at least 1 photo every day
28. Write my birth story
IN PROGRESS 3/12 - 29. Have 12 ‘dates’ with my husband
Thursday, January 27, 2011
Stuff we love: Pinterest
Wow, I have found a beautiful place on the internet. It's so inspiring.
If you like inspiration boards or always liked the idea of a scrapbook or pinboard for cutting and pasting pictures...i.e. for home decoration ideas, projects to try etc...this place is AWESOME :-)
It's called Pinterest and I've seen it mentioned on a couple of lovely blogs so decided to pay a visit...
If you like inspiration boards or always liked the idea of a scrapbook or pinboard for cutting and pasting pictures...i.e. for home decoration ideas, projects to try etc...this place is AWESOME :-)
It's called Pinterest and I've seen it mentioned on a couple of lovely blogs so decided to pay a visit...
It's basically an online pinboard and you can have various pinboards for different themes. I have a few set up such as 'New Zealand is a beautiful place.' 'Rainbows' and 'Quotes and Cuteness'...here's a screen dump of my boards so far....
There is a heap of inspiration already on Pinterest which you can re-pin to your own pinboards plus you can add a 'Pin It!' button to your web browser and pin things from wherever you are visiting on the internet. The best thing is that it links back to the original page you pinned from so you can be sharing great websites and pictures etc with lots of other people as well as keeping your own library/board of links.
Seriously it's AMAZING. It's like Flickr favourites but better and so much more. Just be prepared to lose a couple of hours while you browse :-)
At the moment it's invite only but I think as a member I can invite people so leave a comment if you'd like me to send you an invite.
And you can see all my pinboards here.
Labels:
ideas,
stuff we love
Wednesday, January 26, 2011
String of Hearts Decoration
As mentioned here I decided to have a go at making some Valentines decorations this year. Here's one I made last week...
and here's how I made it...
STRING OF HEARTS
What you will need:
Then I folded the hearts in half lengthways (tip: if you have any ink lines showing - fold them pointing out the way so they will be glued and you won't see them! If you are using patterned paper make sure that is folded in the way)
You need 3 cut out hearts for each heart on the string...
Then I glued a half of 2 hearts together...hope that make sense (if not, hopefully the picture below shows it better) and thread the ribbon through the middle and then glue the third heart in so the ribbon is stuck in the middle.
I started near the top of the ribbon and then spaced the hearts out as I glued them into the ribbon...
It's simple but cute and the baby seems to like watching it twirl in the breeze coming in the back door!
and here's how I made it...
STRING OF HEARTS
What you will need:
- Some thick paper or cardboard (I used plain pink but you could use patterned paper or a range of colours and patterns)
- My String of Hearts printout (or you could use a heart punch or diecut if you have one)
- Some string or thin ribbon (I think mine is about 1 metre long)
- Scissors
- Glue (I used a gluestick)
I used a thin card and ran that through my printer to print out the hearts. Then I cut them out until I had a nice big stack of them. (Of course I had to make the template in the first place by drawing round the orange heart 12 times!)
You could print it out on plain white paper or card and then colour in or decorate as you wish. Could be a great project for children...
Then I folded the hearts in half lengthways (tip: if you have any ink lines showing - fold them pointing out the way so they will be glued and you won't see them! If you are using patterned paper make sure that is folded in the way)
You need 3 cut out hearts for each heart on the string...
Then I glued a half of 2 hearts together...hope that make sense (if not, hopefully the picture below shows it better) and thread the ribbon through the middle and then glue the third heart in so the ribbon is stuck in the middle.
I started near the top of the ribbon and then spaced the hearts out as I glued them into the ribbon...
It's simple but cute and the baby seems to like watching it twirl in the breeze coming in the back door!
Labels:
craftiness,
valentines
Tuesday, January 25, 2011
Scrapbooking: Happy Boy
I am loving Sunday mornings at the moment.
Not only do we all hang out in bed for a while and be lazy (me, G and the baby) but then I also sneak off and get some scrapbooking done!
Sunday just gone I managed a layout plus a secret project (which I will post about in a couple of weeks once the recipient has it!). Here's the layout....
I had been saving this paper for something special and I thought a black and white photo was perfect as the paper is so busy. The photo is also an enlargement. I think its 6 by 8 or something like that. Harvey Norman had them half price a while ago so I ordered some photos bigger than the usual 6 by 4 so I could have a play with different sizes on layouts.
I'm really liking clustering lots of little embellishments together at the moment and finding different ones to mix and match. Here's a close-up of the detail....
Not only do we all hang out in bed for a while and be lazy (me, G and the baby) but then I also sneak off and get some scrapbooking done!
Sunday just gone I managed a layout plus a secret project (which I will post about in a couple of weeks once the recipient has it!). Here's the layout....
I had been saving this paper for something special and I thought a black and white photo was perfect as the paper is so busy. The photo is also an enlargement. I think its 6 by 8 or something like that. Harvey Norman had them half price a while ago so I ordered some photos bigger than the usual 6 by 4 so I could have a play with different sizes on layouts.
I'm really liking clustering lots of little embellishments together at the moment and finding different ones to mix and match. Here's a close-up of the detail....
And a close-up of the small text so you can read it...
Labels:
baby,
craftiness,
scrapbooking
Monday, January 24, 2011
Recipe: Chocolate Brownies (in the microwave)
I've seen mention of this recipe in several different places now so I jotted down the ingredients and how to make and gave it a go on Saturday morning.
So simple, so quick, so yummy!
This brownie recipe has ingredients I usually have in the cupboard/fridge and would make an awesome last minute dessert or home baking for morning teas/coffee groups etc.
Rather than type the recipe I've just taken a picture of my handwritten version for you...
And here's a picture of the finished product. Not the prettiest baking I have to admit but I swear it's yummy!
And so I ended up making one up for my friend whose down for a few days visiting a relative in hospital. I thought it would be the perfect 'emergency' food and included a plastic knife and some napkins for eating on the go :-)
I definitely recommend giving this a go - takes hardly any time at all. I warn you though - it's very hard to stop at one small piece :-)
So simple, so quick, so yummy!
This brownie recipe has ingredients I usually have in the cupboard/fridge and would make an awesome last minute dessert or home baking for morning teas/coffee groups etc.
Rather than type the recipe I've just taken a picture of my handwritten version for you...
And here's a picture of the finished product. Not the prettiest baking I have to admit but I swear it's yummy!
And so I ended up making one up for my friend whose down for a few days visiting a relative in hospital. I thought it would be the perfect 'emergency' food and included a plastic knife and some napkins for eating on the go :-)
I definitely recommend giving this a go - takes hardly any time at all. I warn you though - it's very hard to stop at one small piece :-)
Labels:
recipes
Friday, January 21, 2011
Scrapbooking: Splash!
Here's my second page from the weekend.
These photos were taken on the same day as the Ticket to Ride ones. It was a day of firsts for my baby boy that day! 1st go on the train and 1st go at dipping his toes in the water.
I hadn't managed to take photos of just G and the baby - there were some strangers in the background of the pictures so the layout of these is carefully done to crop the strangers out! I also covered up a random lady with the splash! sticker :-)
When it was finished I felt it needed something to tie it to the page (if that makes sense?) so I hand-drew a border round the photos and also around the edge of the paper.
Quite a simple page really but I'm finding that it's more important I get the photos scrapped simply and get baby's album full of stories and photos than faff around for ages on complicated techniques.
Labels:
baby,
craftiness,
scrapbooking
Subscribe to:
Posts (Atom)


