Monday, October 31, 2011

Kids Rugby World Cup Swap : : What we received and what we sent

We had lots of fun with the Kids Rugby World Cup Swap hosted by Megan at Mouse House.
You might have seen the sneak peek of the Memory Card Game I made for our parcel on Thursday? Well here's a picture of everything that we sent in our English/Scottish themed parcel to Hana and her family...


Our parcel included:
  • Tunnocks Teacakes - from the UK food shop
  • Scotland and England car mirror covers - from New World
  • Union Jack tissues - from a gift shop in Palmy
  • Memory game - home made and featuring English and Scottish pictures
  • Tartan and Union Jack pencils - from the UK food shop
  • Love Hearts Lollies - from the UK food shop
  • A Keep Calm and Carry On greeting card (with a message from us inside!)
  • Scotland stickers - bought from my local scrapbook store a while ago
  • Some Union Jack cupcake flags - from the UK food shop (for the Royal Wedding)
  • Some home made Union Jack mini bunting that I made for the Royal Wedding
  • Some glittery stickers featuring a Union Jack flag, black cab and red double decker bus - from Accessorize in the UK
  • Some home made English and Scottish flag rubber stamps (see below for close-up)
For the hand made rubber stamps I bought some plain rectangular erasers and used my craft knife to cut out the shapes of the Saltire (Scotland) and St. George's Cross (England) flags.
My first attempt at the English flag didn't have a border and it just didn't look right so I made a new one with a slim border around the edge.
The insides (scooped out bits) look a mess but they don't show up on the paper so I didn't tidy them up too much for fear of accidentally chopping off a bit I did need!
I'm pretty pleased with how they turned out and made a little tag (with each one stamped onto it) and put them in a little bag to keep them together...


And here's a peek at the parcel we received from Hana and her family...

I had a big grin on my face as soon as I spotted the box in the mailbox and saw the black and white washi tape decoration!


I was very good and took photos as I opened it...


Here's a list of what we received: 
  • New Zealand balloons
  • Inflatable New Zealand mallet
  • RWC Sticky plasters
  • Some New Zealand stickers
  • a Rugby ball shaped biscuit!
  • Sky Tower coaster
  • Pukeko magnet
  • New Zealand pencil case 
  • Some little kiwiana notepads (the picture on the front is repeated faintly on the pages inside) 


There was also this awesome pen which has a little button you press and the rugby ball springs off. I honestly couldn't wrestle it off him to put with the other things for the photo...


We blew up some of the balloons on RWC final day, put the fern stickers on our faces and blew up the mallet to knock the balloons around :-)


It was lots of fun and I really enjoyed participating in the swap!
Many thanks to Megan for hosting and Hana for such an awesome swap parcel :-)

Saturday, October 29, 2011

The Christmas Challenge


Have you seen that Stacey at Polka Dot Daze is hosting a Christmas Challenge?


The details:

The challenge will start on Tuesday 1 November

  • On your blog post your list of what you would like to make in time for Christmas
  • Link your post to Stacey's blog on the special page "The Christmas Challenge Team" so we can all see what you are hoping to achieve and who's joining in
  • Then each Tuesday post on your blog what you have completed
  • Link your post to this blog under the correct week update i.e. "Week One" so we can all pop around cheering each other on


If you are hoping to get organised early for Christmas and plan to make some gifts, why not join in?

The great thing about signing up is I'm already thinking about what I want to make and who I need to organised presents for :-)

Friday, October 28, 2011

Giveaway Winner


Thank you to those who entered my giveaway and for the lovely comments. I wish you could all win!
I wrote down all the names of those who entered onto little pieces of paper (with extra entries for followers) and hubby chose a winner...


The winner is Jennifer Rose! Congrats :-)
I'm going to email you but if you see this first please email your postal address to me at katie (at) mummy-adventures (dot) com so I can post off you prize :-)

Also - just a quick note to everyone else that entered - if you would be interested in purchasing a crochet bag I could make some for my Felt shop. I can give you a range of colours to choose from and each bag would cost $15 plus postage. Let me know if you're keen :-)

Thursday, October 27, 2011

My Creative Space: Memory Card Game

I finally got my Rugby World Cup Swap parcel sent this week. I'll share everything that was in it in a few days once my swap partner has received it. And I'll also share what we received from Hana and her family - lots of fun things and it was very exciting opening the box when it arrived :-)
But I thought I'd share a sneak peek with you today...


I offered to send an England/Scotland themed parcel to a kiwi. I was able to find some things to send at our local UK shop and even around town but I also hand-made a few items too.

One of them was a Memory Card Game. Do you remember the game from when you were little? There are pairs of pictures and you lay all the cards face down and take it in turns to flip two over. If they match, you win a point and if not you flip them back over and remember where they are for when their pair comes up.

I found all the images via my lovely friend Google :-) And printed 2 to a 6x4 photo print. I cut them down and matted them with some pretty scrapbooking card on the back. 
I then wrote some instructions and printed them out as well as a key to what all the pictures are so that the players can learn about England and Scotland while playing the game.
Finally I found a box to up-cycle to pack the cards into. It was a velcro dots container and I covered it in the rest of the card from the back of the cards to match (cutting a circle from the front to match the window on the box).

I'm really pleased with how it turned out and will probably make another version for my wee man soon - maybe for Christmas.

I've copied the instructions I wrote out below in case anyone would like to use them to make their own version :-)

Memory – 2 player game
Lay the cards out on the floor or table face down.
Take turns to flip first one card over, then a second. If the two cards match you get 1 point, remove the cards from the game and get another turn. 
If they do not match, turn both cards over and the other player gets a turn.
The winner is the person who has the most matched pairs once they have all been matched. 
When the cards are turned over it is important to remember where they are for when the matching card is turned up later in the game.


Linking up with Our Creative Spaces.

Tuesday, October 25, 2011

30 @ 30 :: the list


I'm changing things up a little for my 30 @ 30 list. I'm still planning to do 30 things aged 30 but I am prioritising certain things by giving them more bullets on the list and I'm also allowing flexibility for adding/removing things as the year goes on based on what is current at the time.

Here goes...
30 @ 30
  1. Lose 1 kg
  2. Lose 1 kg (2kg total)
  3. Lose 1 kg (3kg total)
  4. Lose 1 kg (4kg total)
  5. Lose 1 kg (5kg total)
  6. Lose 1 kg (6kg total)
  7. Lose 1 kg (7kg total)
  8. Lose 1 kg (8kg total)
  9. Lose 1 kg (9kg total)
  10. Lose 1 kg (10kg total)
  11. Summer blocks
  12. Autumn blocks
  13. List 5 items for sale on Felt
  14. de-clutter and sort out office
  15. learn to crochet hats
  16. makeover another cushion
  17. make mini albums for my 30th and baby's 1st birthday
  18. scrapbook at least 10 photos from each month (if I continue with Document 2011 and go on to do it in 2012 this should be covered by that)
  19. Summer 2011/2012 seasonal project 1 - paint the front door
  20. Summer 2011/2012 seasonal project 2 - revamp the toadstools in the back garden
  21. Summer 2011/2012 seasonal project 3 - de-clutter/clear boxes from dining room
  22. Autumn 2012 seasonal project 1 - to be decided
  23. Autumn 2012 seasonal project 2 - to be decided
  24. Autumn 2012 seasonal project 3 - to be decided
  25. Winter 2012 seasonal project 1 - to be decided
  26. Winter 2012 seasonal project 2 - to be decided
  27. Winter 2012 seasonal project 3 - to be decided
  28. Spring 2012 seasonal project 1 - to be decided
  29. Spring 2012 seasonal project 2 - to be decided
  30. Spring 2012 seasonal project 3 - to be decided
So as you can see - I want to lose 10kg but rather than list that as one item I've made each kilo a point on the list. I really want to get healthier and losing weight is a big part of that. To lose weight I need to eat healthier and exercise more so healthier living will come gradually as I tick each kilo off the list. I'm also hoping that by breaking it into bite-size pieces it will be more achievable. With this taking up a third of my list I'm trying to keep reminding myself how important it is (for all those times that I start to lose sight of why I'm doing it and want to give up).

The next 8 things on the list are things I want to achieve over the course of the year.

And the final twelve things are split down by seasons (although the dates will be slightly different from the actual seasons to fit around when my birthday falls. The summer list will be from November to January, Autumn from February to April, Winter from May to July and Spring from August to October).
Each season is 3 months long so I am aiming for 3 projects each season (i.e. one each month although I don't have to spread them out like that) which may be season dependent (i.e. involved being outside so need to be done in warmer weather or involve being inside a lot so better for the colder months) or just something I decide I want to do at the start of each season. It also means I can review things as the year goes on and add things rather than thinking "I'll have to wait for my next list to do that!"
So a bit different from my past attempts but I hope it will be successful. 

(You can see what I did for my 29 @ 29 list and how I did here)

Monday, October 24, 2011

29 @ 29 - the final review

I'm gonna caption this one "Keep on Swimming"!

I am now officially 30 so it's time for a final review of how I did with my 29 things to do aged 29 list...

Colour-coded for colourful reading! PINK = complete, RED = not completed.


29 @ 29
DONE 1. Paint my toenails 
DONE 2. Scrapbook at least 12 moments of baby’s first year
3. Plant sunflower seeds/grow sunflowers
 DONE 4. Eat tiramisu
 DONE 5. Get my hair cut
 DONE 6. Summarise/scrapbook our first year married
 DONE 7. Read a novel
 DONE 8. Lose 5kg
 DONE (and I'm back at work!) 9. Decide if I’m returning to work or not
 DONE 10. Participate in a Christmas ornament swap
 DONE 11. Write a Christmas newsletter
 DONE 12. See Harry Potter 7 (part 1) ...and as a bonus I saw Part 2 as well :-)
 DONE 13. List 29 reasons why I’m a good mother
 DONE 14. Blog at least 29 times
 DONE 15. Email at least 50 photos/videos of baby to family
 DONE 16. Finish rainbow crochet blanket
 DONE 17. Get a nice photo of all 3 of us
DONE 18. Take baby swimming
 DONE 19. Send 10 postcards or letters (with photos of baby maybe)
DONE 20. Buy at least 10 bunches of flowers
DONE 21. Try 10 new recipes
 22. Create a photo wall (in the dining room?)
 DONE 23. Make bunting for baby’s bedroom
 DONE 24. Have a picnic or tea party
 DONE 25. Find ways to celebrate each season
 DONE 26. Give away at least 29 things
 DONE 27. Try to take at least 1 photo every day
 28. Write my birth story
 DONE 29. Have 12 ‘dates’ with my husband

And some notes on the ones I didn't complete...
  • I was disappointed I didn't manage to plant sunflowers. I bought seeds months ago but when it came to this month I couldn't find them to plant them - what a silly hold up. I even looked at the DIY store for some more but they had run out!
  • The photo wall got put on hold when we put the house in the market because I didn't want to make too many holes in the wall if we were moving. Then when we took the house off the market I never quite got round to it. I might still look at doing this in the future.
  • Writing my birth story didn't happen either. Over a year on from the event it's impossible to remember the details. It's too woolly. I should have done it in the first few weeks after the birth but lack of sleep and complete shock of our much our lives had changed were keeping me too busy :-) Maybe next time!
26 out of 29 is an awesome achievement and I'm pleased with how much I got done. I also think I did the right thing by picking lots of fun and one-off items as it was a pretty full-on year and it was a good balance of things I wanted to do and other things that make life better :-)

Look out soon for my 30 @ 30 list - I've mixed it up a little from previous lists so fingers crossed it works!

Thursday, October 20, 2011

My Creative Space: Ripple Progress

I feel like I'm making significant progress on my ripple. Although I way over-estimated the width of my pillows so it's not going to be a pillow case...it's another baby blanket! Now I just need a baby to give it to :-)

When I posted about the ripple at the start of the week I only had 1 lonely ripple...a little while later I had 7....


I think I could happily crochet rainbows forever without getting bored of the colour combination!
This is how my ripple was looking yesterday afternoon....


And here's some ruffled ripples...


It really is quite a soothing stitch to sit of an evening and do. A nice wind-down at the end of the day.
I am hoping to do at least 3 rainbows (so 21 ripples) maybe 4 (28 ripples) but I might run out of yarn! Hopefully the yarn shop still has some if I need to replenish supplies :-)

Linking up with Our Creative Spaces.

P.S. Don't forget to enter my giveaway to win a crochet bag and some other goodies :-)

Tuesday, October 18, 2011

Celebrating 1 Year (including a giveaway!)

Wow, it's my 1 year blogiversary today! Can you believe it?
It all started here on the 18th October last year.
And in my 1st year of blogging at Mummy Adventures, there has been plenty of...

:: crochet ::


:: scrapbooking ::


:: recipes ::


:: pretty flowers ::


:: cute animals ::


:: seasonal loveliness ::


:: and of course a rather gorgeous baby ::


It's been a fun first year. Thanks to everyone that reads my posts and to everyone that comments :-)

To celebrate my 1st blogiversary I've put together a little goody bag to giveaway.
The bag itself is handmade by me and is a granny square bag in bright colours - it would make a good bag for a little person or a gift bag too. Inside the bag I've tucked some Scottish Tablet, some Galaxy chocolate (which is British and yummy - it's my husband's favourite). There's also some Keep Calm and Carry On tissues and a cute little bunting notepad - a great size for your bag.


To be in with a chance to win leave me a comment (you could tell me what you like reading about here at Mummy Adventures or share a favourite blog/website you like to visit). Followers (remind me in your comment if you follow me) will get an extra entry.
I'll leave it open until the 28th October and draw the winner then. Don't forget to make sure I have a way to contact you if you win.
Good Luck :-)


Monday, October 17, 2011

~~~ a ripple along ~~~

I've been wanting to learn to ripple (crochet) for a while but every time I looked at pictures of some lovely ripples I got a little scared it would be too hard.
But now Lucy at Attic 24 and Heather at Little Tin Bird are hosting a ripple along! There's a group on Flickr to share pictures of your lovely ripples and the added benefit of knowing that 2 amazing ripplers (is that a word?!) are rippling right along with you :-)
So over the weekend I found Lucy's instructions that I'd printed AGES ago and sat down and did a practice ripple.
Woo-hoo - it worked!


So I have started a ripple cushion cover.


I'm hoping to move on to a blanket but we will see how the smaller project goes first!
I am using up the yarn left over from the rainbow blanket.


Anyone else rippling along?

Sunday, October 16, 2011

Sharing on Sunday - 16th October


Happy Sunday :-)

Here's some lovely pins and links for you this week...

First up - crochet daisies....I'm thinking a lovely summery daisy chain garland...

Here's a great healthy idea for halloween...

 Aren't these nails beautiful? There's no way I have enough patience to do this but I still love them!

An awesome stocking stuffer idea - snowglobe soap!

Here's one I pinned myself after reading the Ezibuy Christmas catalogue. I went and ordered these yesterday - can't wait for them to arrive :-)

And I couldn't resist this one....AA for pinners :-)

Hope you all have a lovely week. It's a special one for me this week - not only is it the 1st blogiversary of Mummy Adventures but it's also the big 3-0 for me! Look out for a giveaway coming later this week to celebrate :-)

Thursday, October 13, 2011

Ta-dah! Hexagon Baby Blanket

My hexagon baby blanket is finished - woop!


You may remember the sneak peeks of this blanket here and here and now it's time to show off the finished article :-)
Once I had new wool from the shop it came together pretty quickly. I turned all the circles into hexagons using the aqua coloured wool like I planned and then I edged the blanket with the 3 different colours I had used to make up the circles. I'm pretty pleased with how it ended up...


...although unfortunately I didn't find this tutorial for non-crinkly edges before it was too late so my edging is most definitely crinkly - even after blocking (although better after blocking than before!). I granny trebled into each gap - even the ones right beside each other where the hexagons join and that's what has caused the crinkling.

Here's the full blanket made up of 25 hexagons, joined on the go (thanks Lucy!) with 3 rounds of granny treble edging.


I'm hoping it's the perfect size for a baby blanket for capsules and buggy's. I measured it against one of our favourite baby blankets and it's pretty much the same size so hopefully my friend thinks so too!

You can see more of my crochet projects here.

Linking up with Our Creative Spaces.

Tuesday, October 11, 2011

Crochet Balls

Last week I was struck with the urge to crochet some balls. I'm sure that sounds strange but I was finished with the baby hexie blanket (reveal to come shortly - it's being blocked at the moment) and wasn't sure what to do next. I wanted to make something fairly quick and easy but it had to be fun as well. I must have seen mention of crochet balls around the web before but I couldn't remember where so I did a search and came up with this tutorial at Greedy for Colour.

It's pretty straight forward and I managed to make my first ball during baby's naptime and another later that night. I used a multi-coloured yarn and stuffed them with Hobby Fill (bought at Spotlight ages ago for around $6 for a big bag).


I then decided to buy some little bells to put inside balls so they would jingle when baby played with them. I dashed off to Spotlight on Saturday morning and got a bag of 50 small bells for $6. I made another ball using some light blue yarn I had leftover from the hexie blanket and added a bell at the time of stuffing. Baby is quite taken with them. He is definitely going through a ball phase (perhaps as a boy he will never grow out of it?!) and I like that these are soft and can't do any damage if he throws them around.
I also made an extra one for our Operation Christmas Child shoebox.


Just a couple of notes:
  • Perhaps it's the strange way I crochet but the first two (multi-colour)balls are actually inside out! When I get to the 5 rows of the same number of stitches I have to turn my work inside out for the nice lines to show (as you can see on the blue ball)
  • if you can't count or give the stitch counting your full attention it might be wise to use stitch markers. I didn't but I'm convinced I did drop a stitch here and there
  • The smaller multi-coloured ball was made using a 2.5mm hook and the other 2 were made using a 4mm hook.
Now I'm wondering what else I can crochet balls for! I am thinking about incorporating it into my ornament swapping...maybe...but I cannot confirm or deny at this stage :-)

Monday, October 10, 2011

Operation Christmas Child (year 2)

Last year way back at the beginning of this blog I posted about Operation Christmas Child but I was a little late to inspire others to get involved! This year I'm a little ahead of schedule and thought I'd share what's going in our shoebox this year.
For those that haven't heard about it before - Operation Christmas Child is all about delivering presents to children in need. You fill a shoebox with a range of items (such as toys, toiletries, stationery and small items of clothing) for a specific gender and age range and drop it in to your local collection point. The boxes are then distributed to children in need all over the world. You can read more about it here.

So here's how our box is looking this year...


We decided to make a box for a boy aged 2-4 years this year. As well as the $9 box donation (for freight) I've probably spent around $20 to fill the box. The contents are:

  • dog cuddly toy
  • stacking cups
  • handmade crochet ball with a bell
  • rubber bouncy ball
  • pegs with animals on them
  • My Happy book
  • multi-colour pen
  • toothbrush
  • soap
  • Winnie the Pooh plasters
  • post-it's
  • chalk
  • a hardback notepad
  • an animal beaker
  • 2 face flannels
I'm also going to raid my sticker collection and find some to add in and write a letter on behalf of my baby boy for the recipient of the shoebox.

I'm sure I could have saved money by making more items (I'm going to attempt a crocheted beanie and handmade soft toy next year I think) and also buying some of the items as I saw them on special. I'll try to be more organised next year!

Anyway - if you're keen to do your own shoebox (and you can do as many as you like as long as you pay the $9 donation for each one) head over to the list of collection points and check when the deadline is for dropping off. You can also pick up a box from them (like I did -you can see it at the back of all the items in the photo) if you don't have one.

Palmy people - I got the box and will be dropping it back off at Manna on Broadway and their deadline for drop-off's is 22nd October.

And if you are inspired to fill your own box I'd love to hear about it :-)


Thursday, October 6, 2011

My Creative Space: Sunburst Canvas

I saw this post a couple of weeks ago and loved the look of the pinwheel painting. I also pinned this and this and this a while back. I love "You are my Sunshine" and decided to combine the pinwheel idea and "you are my sunshine" on a canvas for baby's room....


I faintly drew a dot on the canvas and the lines with pencil and used masking tape to paint the sections in alternate gold and yellow. To tidy the lines up a little once I was done I drew over them with a silver pencil. I also painted the sides of the canvas gold.
It's supposed to look like a sunburst and I think maybe it does :-)
I couldn't decide how to get the text on there. I was going to paint them on there in large lettering but I also wanted to add something to the middle of all the points. So in the end I wrote "You are my Sunshine" on a small scalloped circle and stuck it on with glue dots.


I'm pretty pleased with how it turned out and now just need to decide where to put it up in baby's room.

Joining in with Our Creative Spaces.

Tuesday, October 4, 2011

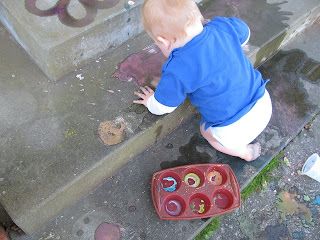
Homemade Chalk Paint

After seeing pins like this one all over Pinterest recently I decided to have a go at making up some chalk paint.
Basically you mix cornflour, water and food colouring and give it a stir and it's ready to use. Easy Peasy :-)

I used one of my silicon muffin tins to make up 6 colours - red, orange, yellow, green, blue and purple. I made smaller amounts than the recipe suggested as I didn't want to make heaps if baby wouldn't be interested. I also dug out my old pastry brush as it had a chunkier handle and would make larger strokes than any of the paint brushes I have in my craft room.

We headed out to the steps leading up to our front door (which some may say is a silly choice but it was in the shade and away from the dog so the best place at the time!) and got started. Baby loves going out the front door and rummaging so was out like a shot. I started swirling the brush round in the colours and brushing it onto the steps which promptly got his attention and he had a go...


I did start off with a separate pot of water to rinse the brush but it got knocked over so in the end the colours started merging together! 


I thought I'd made the colours too dull to begin with but once they started drying they really brightened up (brighter than they look in this photo). 
The next day we rinsed it off with a watering can full of water and most of it came away. There was some left but we've had rain which has now rinsed most of the colour off. My flower on the top step is still there as a lovely reminder though :-)


It was lots of fun and a great activity for a warm day :-)

Monday, October 3, 2011

Kiwi Christmas Ornament Swap 2011


Dione at Sew Funky is hosting the Kiwi Christmas Ornament Swap again this year. 
It's open to people living in New Zealand. Basically you design and make 5 or 6 ornaments and post them off and in return you receive the same number back. I participated last year and it was great fun both making the ornaments and waiting for them in the mail :-)
If you're keen to join in for 2011 head over to Sew Funky to read the rules and sign up.

You can see the ornaments I made last year here and the ones I received here.

Sunday, October 2, 2011

Sharing on Sunday - 2nd October


Wow, Sunday again already! And it's October which is one of my favourite months - I like the name of it, I like Spring (and Autumn which it used to fall in!) and it's my birthday month :-)

So onto some links to share with you. Looking over my recent pins there are lots of Christmassy ones at the moment. Apologies to those of you who like to ignore Christmas as long as possible but I am feeling very inspired for some ornament making this year!

First up is a tutorial over at Bugs and Fishes for Candy Cane ornaments - cute huh?

I loved this one when I saw it - a cheat sheet for drawing farm animals! I'm sure this will come in handy over the next few years when I am asked to draw things by baby boy :-)

And how fabulous are these FREE printables for baby's room - just lovely....

Lastly - one to make you smile. I am old enough to remember cassette tapes but it's crazy to think that my boy will have no idea what they are! My first tapes were Kylie Minogue and Jason Donovan....ahhh, the memories :-)

Wishing you a lovely week :-)

LinkWithin

Related Posts Plugin for WordPress, Blogger...