Thursday, October 13, 2011

Ta-dah! Hexagon Baby Blanket

My hexagon baby blanket is finished - woop!


You may remember the sneak peeks of this blanket here and here and now it's time to show off the finished article :-)
Once I had new wool from the shop it came together pretty quickly. I turned all the circles into hexagons using the aqua coloured wool like I planned and then I edged the blanket with the 3 different colours I had used to make up the circles. I'm pretty pleased with how it ended up...


...although unfortunately I didn't find this tutorial for non-crinkly edges before it was too late so my edging is most definitely crinkly - even after blocking (although better after blocking than before!). I granny trebled into each gap - even the ones right beside each other where the hexagons join and that's what has caused the crinkling.

Here's the full blanket made up of 25 hexagons, joined on the go (thanks Lucy!) with 3 rounds of granny treble edging.


I'm hoping it's the perfect size for a baby blanket for capsules and buggy's. I measured it against one of our favourite baby blankets and it's pretty much the same size so hopefully my friend thinks so too!

You can see more of my crochet projects here.

Linking up with Our Creative Spaces.

Tuesday, October 11, 2011

Crochet Balls

Last week I was struck with the urge to crochet some balls. I'm sure that sounds strange but I was finished with the baby hexie blanket (reveal to come shortly - it's being blocked at the moment) and wasn't sure what to do next. I wanted to make something fairly quick and easy but it had to be fun as well. I must have seen mention of crochet balls around the web before but I couldn't remember where so I did a search and came up with this tutorial at Greedy for Colour.

It's pretty straight forward and I managed to make my first ball during baby's naptime and another later that night. I used a multi-coloured yarn and stuffed them with Hobby Fill (bought at Spotlight ages ago for around $6 for a big bag).


I then decided to buy some little bells to put inside balls so they would jingle when baby played with them. I dashed off to Spotlight on Saturday morning and got a bag of 50 small bells for $6. I made another ball using some light blue yarn I had leftover from the hexie blanket and added a bell at the time of stuffing. Baby is quite taken with them. He is definitely going through a ball phase (perhaps as a boy he will never grow out of it?!) and I like that these are soft and can't do any damage if he throws them around.
I also made an extra one for our Operation Christmas Child shoebox.


Just a couple of notes:
  • Perhaps it's the strange way I crochet but the first two (multi-colour)balls are actually inside out! When I get to the 5 rows of the same number of stitches I have to turn my work inside out for the nice lines to show (as you can see on the blue ball)
  • if you can't count or give the stitch counting your full attention it might be wise to use stitch markers. I didn't but I'm convinced I did drop a stitch here and there
  • The smaller multi-coloured ball was made using a 2.5mm hook and the other 2 were made using a 4mm hook.
Now I'm wondering what else I can crochet balls for! I am thinking about incorporating it into my ornament swapping...maybe...but I cannot confirm or deny at this stage :-)

Monday, October 10, 2011

Operation Christmas Child (year 2)

Last year way back at the beginning of this blog I posted about Operation Christmas Child but I was a little late to inspire others to get involved! This year I'm a little ahead of schedule and thought I'd share what's going in our shoebox this year.
For those that haven't heard about it before - Operation Christmas Child is all about delivering presents to children in need. You fill a shoebox with a range of items (such as toys, toiletries, stationery and small items of clothing) for a specific gender and age range and drop it in to your local collection point. The boxes are then distributed to children in need all over the world. You can read more about it here.

So here's how our box is looking this year...


We decided to make a box for a boy aged 2-4 years this year. As well as the $9 box donation (for freight) I've probably spent around $20 to fill the box. The contents are:

  • dog cuddly toy
  • stacking cups
  • handmade crochet ball with a bell
  • rubber bouncy ball
  • pegs with animals on them
  • My Happy book
  • multi-colour pen
  • toothbrush
  • soap
  • Winnie the Pooh plasters
  • post-it's
  • chalk
  • a hardback notepad
  • an animal beaker
  • 2 face flannels
I'm also going to raid my sticker collection and find some to add in and write a letter on behalf of my baby boy for the recipient of the shoebox.

I'm sure I could have saved money by making more items (I'm going to attempt a crocheted beanie and handmade soft toy next year I think) and also buying some of the items as I saw them on special. I'll try to be more organised next year!

Anyway - if you're keen to do your own shoebox (and you can do as many as you like as long as you pay the $9 donation for each one) head over to the list of collection points and check when the deadline is for dropping off. You can also pick up a box from them (like I did -you can see it at the back of all the items in the photo) if you don't have one.

Palmy people - I got the box and will be dropping it back off at Manna on Broadway and their deadline for drop-off's is 22nd October.

And if you are inspired to fill your own box I'd love to hear about it :-)


Thursday, October 6, 2011

My Creative Space: Sunburst Canvas

I saw this post a couple of weeks ago and loved the look of the pinwheel painting. I also pinned this and this and this a while back. I love "You are my Sunshine" and decided to combine the pinwheel idea and "you are my sunshine" on a canvas for baby's room....


I faintly drew a dot on the canvas and the lines with pencil and used masking tape to paint the sections in alternate gold and yellow. To tidy the lines up a little once I was done I drew over them with a silver pencil. I also painted the sides of the canvas gold.
It's supposed to look like a sunburst and I think maybe it does :-)
I couldn't decide how to get the text on there. I was going to paint them on there in large lettering but I also wanted to add something to the middle of all the points. So in the end I wrote "You are my Sunshine" on a small scalloped circle and stuck it on with glue dots.


I'm pretty pleased with how it turned out and now just need to decide where to put it up in baby's room.

Joining in with Our Creative Spaces.

Tuesday, October 4, 2011

Homemade Chalk Paint

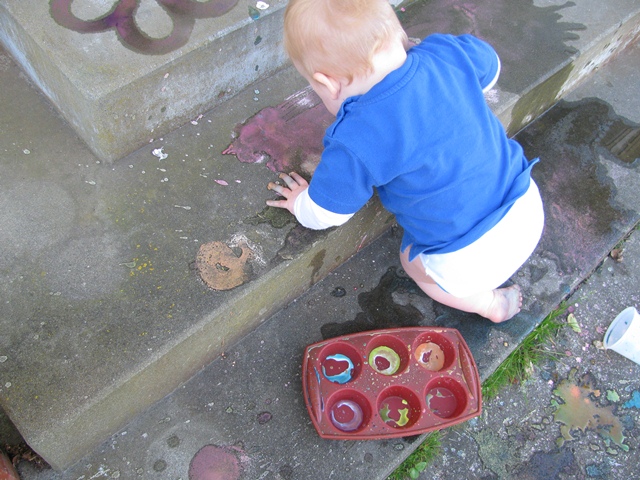
After seeing pins like this one all over Pinterest recently I decided to have a go at making up some chalk paint.
Basically you mix cornflour, water and food colouring and give it a stir and it's ready to use. Easy Peasy :-)

I used one of my silicon muffin tins to make up 6 colours - red, orange, yellow, green, blue and purple. I made smaller amounts than the recipe suggested as I didn't want to make heaps if baby wouldn't be interested. I also dug out my old pastry brush as it had a chunkier handle and would make larger strokes than any of the paint brushes I have in my craft room.

We headed out to the steps leading up to our front door (which some may say is a silly choice but it was in the shade and away from the dog so the best place at the time!) and got started. Baby loves going out the front door and rummaging so was out like a shot. I started swirling the brush round in the colours and brushing it onto the steps which promptly got his attention and he had a go...


I did start off with a separate pot of water to rinse the brush but it got knocked over so in the end the colours started merging together! 


I thought I'd made the colours too dull to begin with but once they started drying they really brightened up (brighter than they look in this photo). 
The next day we rinsed it off with a watering can full of water and most of it came away. There was some left but we've had rain which has now rinsed most of the colour off. My flower on the top step is still there as a lovely reminder though :-)


It was lots of fun and a great activity for a warm day :-)

Monday, October 3, 2011

Kiwi Christmas Ornament Swap 2011


Dione at Sew Funky is hosting the Kiwi Christmas Ornament Swap again this year. 
It's open to people living in New Zealand. Basically you design and make 5 or 6 ornaments and post them off and in return you receive the same number back. I participated last year and it was great fun both making the ornaments and waiting for them in the mail :-)
If you're keen to join in for 2011 head over to Sew Funky to read the rules and sign up.

You can see the ornaments I made last year here and the ones I received here.

Sunday, October 2, 2011

Sharing on Sunday - 2nd October


Wow, Sunday again already! And it's October which is one of my favourite months - I like the name of it, I like Spring (and Autumn which it used to fall in!) and it's my birthday month :-)

So onto some links to share with you. Looking over my recent pins there are lots of Christmassy ones at the moment. Apologies to those of you who like to ignore Christmas as long as possible but I am feeling very inspired for some ornament making this year!

First up is a tutorial over at Bugs and Fishes for Candy Cane ornaments - cute huh?

I loved this one when I saw it - a cheat sheet for drawing farm animals! I'm sure this will come in handy over the next few years when I am asked to draw things by baby boy :-)

And how fabulous are these FREE printables for baby's room - just lovely....

Lastly - one to make you smile. I am old enough to remember cassette tapes but it's crazy to think that my boy will have no idea what they are! My first tapes were Kylie Minogue and Jason Donovan....ahhh, the memories :-)

Wishing you a lovely week :-)

LinkWithin

Related Posts Plugin for WordPress, Blogger...